Seams & finishing
This is the panel that turns a plain vector shape into a real sewing or cosplay pattern. Find it collapsed under Fold lines, seam allowance, corner rounding, offset path, foam bevel compensation, and live symmetry in the side panel.
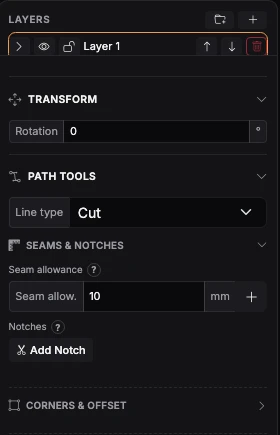
Fig. 1 — The Path Tools and Seams & Notches panel for a selected shape, showing its Line type and Seam allowance fields and the Add Notch button
Line type
Every edge is a Cut line by default. Change it to Mountain fold, Valley fold, Score, or Glue tab instead, and it exports to its own DXF layer under that name — this is also how a laser cutter or CNC knows to score a fold line rather than cut straight through it.
Dashes & arrows
For annotation lines — a "fold here" arrow, a dimension line, a stitch line — the Appearance section has Dashes (Solid, Dashed, Dotted, Dash-dot, or Custom… for your own dash and gap lengths in mm, e.g. 4 2) and, on an open path, Arrows for its start and end: a filled Arrow, an Open arrow, or a Bar across the end like on a dimension line. The arrows grow with the stroke width. A Mountain fold, Valley fold or Score line type keeps its own dashes, whatever Dashes says. In a DXF export, arrows land on their own ARROWS layer so a cutter can skip them; dashes aren't part of a DXF.
Seam allowance
Set a flat distance for the whole shape, or click the round marker on a single edge first to give just that edge its own allowance — a hem might get more than the rest, a fold edge none at all. Add a seam allowance outline at this distance creates a new outline at that distance; your original cut line stays exactly where it was, underneath.
Notches
Click Add Notch, then click a point along an edge (straight or curved) to drop a sewing match-point there — the little marks that line up two pieces correctly when you sew them. Choose Single, Double, or Triangle from the notch type dropdown. Click an existing notch to edit it, flip its direction, or remove it.
Corner rounding & offset path
Corner rounding rounds every sharp corner of the selected path by a radius you set — useful for softening a drafted corner before it goes anywhere near a blade. Offset path creates a whole new outline offset by a distance from the original: positive grows the shape outward, negative shrinks it inward.
Foam bevel compensation
For EVA foam and similar thick materials, click a diamond marker on a straight edge to set that edge's bevel angle (30°, 45°, or 60°). A material preset — 2/5/10mm EVA foam, fabric, acrylic, leather, cardboard, Worbla — fills in a sensible thickness to start from. Create a new cutting-line outline then generates a new outline that accounts for the material's thickness at each marked angle, so the piece actually closes up correctly once it's cut and glued at that bevel.
Live symmetry
Toggle Symmetry (Object menu) live-mirrors a selected path across a vertical (left/right) or horizontal (top/bottom) axis as you keep editing the original — perfect for a piece that should be perfectly symmetric, like a chestplate half. Toggle it again to stop: the mirrored copy stays behind as its own independent shape rather than disappearing.